
The official VCS email signature is shown below. If you will be sending email on behalf of VCS, you should use it, customizing it to match your job details:
 |
YOUR NAME IN CAPS Your Position
|
|||||||||||
First, click the red button below to copy the HTML code for the signature:
Now it’s time to install it into your mail program(s). We will provide instructions for the three most-common programs (Apple Mail for macOS, Apple Mail for iOS, and Gmail). If you use a mail program other than these three, you may have to google for instructions on how to install an HTML signature into those programs.
Installation instructions for Apple Mail (macOS)
- Open the Apple Mail app on your Mac.
- Go to the Mail menu, then choose Settings (or Preferences in older macOS versions).
- Click on the Signatures tab.

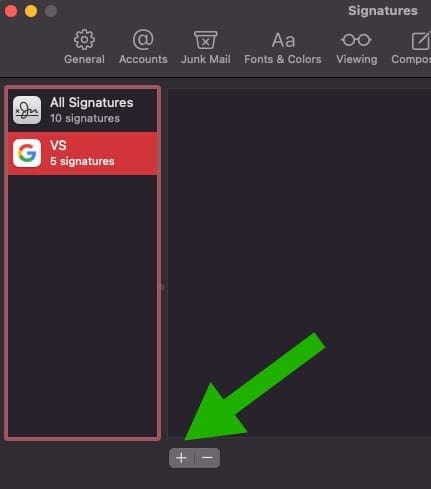
- At the bottom of the second column, click + to create a new signature.
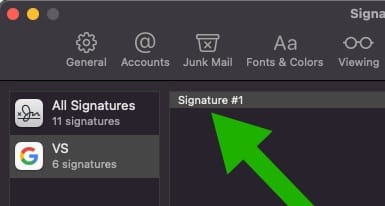
- A new signature will appear, usually called “Signature #X”. You can rename it appropriately (e.g. “VCS Signature”).
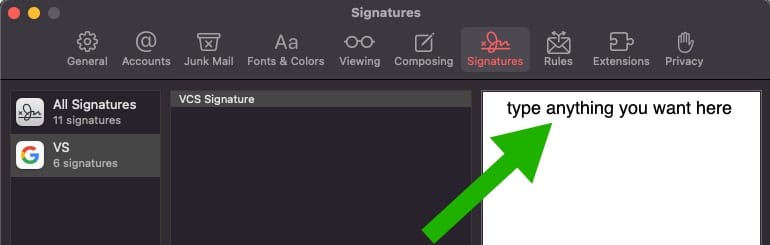
- In the third column, type any temporary placeholder text in the signature box.
- Modify the checkboxes. Make sure:
- “Always match by default message font” should be UNCHECKED.
- “Place signature above quoted text” should be CHECKED.

- At this point, click on another signature, and then click back to the “VCS Signature” to ensure the checkboxes stuck on what you set them as! If not, you’ll need to reset them, and try navigating to another signature and back to the “VCS Signature” again.
- Once you’re sure “always match my default message font” is OFF, you can replace the temporary signature with the HTML for your custom VCS signature. Here are the steps to do that. First, use the red Copy HTML Signature button (from the top of this web page) to copy it to your clipboard.
- In the right pane, click once to focus, and hit Cmd+A (Select All) and then Backspace or Delete to delete everything that’s there.
- Paste in the custom HTML you copied by hitting Cmd+V (Paste). Note that images will NOT load in the Signatures previewer, but will appear normally when you actually use them. The formatting might also look strange; this can be ignored for now.
- Customize the Name, Position, and Phone Extension fields.
- DO NOT highlight entire lines and replace them, as this can result in lost formatting.
- Replace existing text letter by letter.
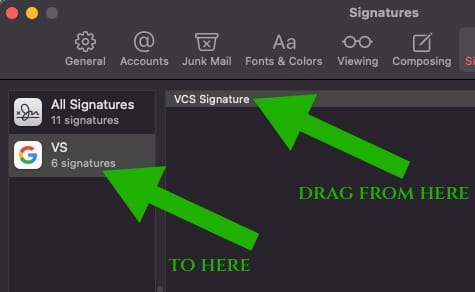
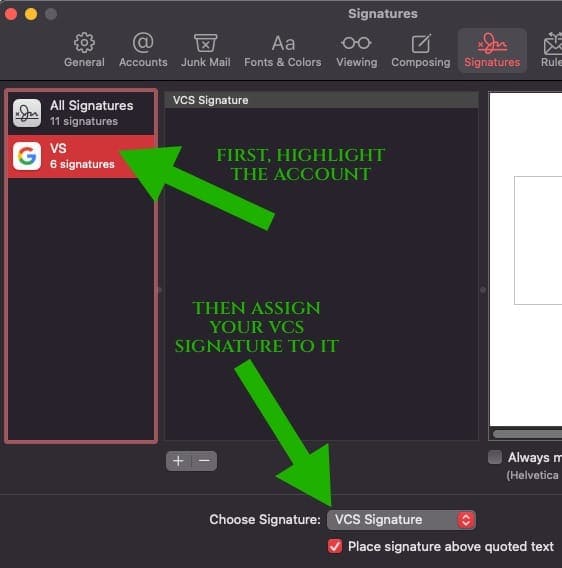
- Now we’ll assign the new signature to your VCS account. (If you have non-VCS accounts also loaded into Apple Mail, this signature will not apply to those.) In the second column, select your “VCS Signature” and drag it into the first column over your VCS account.
- In the left column, click on the VCS account, then at the very bottom of the window, pull down the menu and assign your VCS signature to your VCS account. This tells Mail to automatically use the VCS Signature anytime you’re writing a VCS e-mail:
- The signature should now be installed correctly. While the images won’t appear properly in this Settings dialog box, you can now open a new mail message, and your customized VCS signature should now appear automatically at the bottom of your mail.
Installation instructions for Apple Mail (iOS/iPhone/iPad)
- On your iPhone/iPad, go to the top of this web page, click the red button below to copy the HTML code for the signature.
- Open Settings on your iPhone or iPad.
- Scroll down and tap Mail (which may be inside the Apps menu, towards the bottom).
- Select Signature.
- At the top, make sure “Per Account” is selected. (This will make sure the VCS signature is only applied to VCS mails.)

- Scroll to the email account where you want to apply the signature.
- Paste the copied HTML signature. It will look like this:

- Customize the three unique items: name, position, and phone extension.
Your email signature is now installed on iOS/iPadOS!
Installation instructions for Gmail
- Go to the Gmail settings:
- Open Gmail in your web browser.
- Click on the gear icon (⚙️) in the top-right corner.
- Select See all settings from the dropdown.
- Signature editor:
- In the General tab, scroll down to the “Signature” section.
- Click + Create New to add a new signature.
- Name it something recognizable, like VCS Signature.
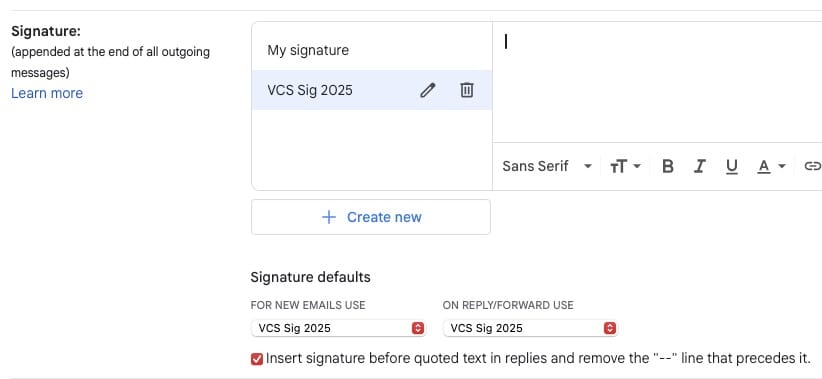
- Set Gmail Signature defaults:
- Under “Signature defaults”, choose:
- For New Emails: Select VCS Signature.
- For Reply/Forward Emails: Select VCS Signature.
- Check the box for “Insert signature before quoted text” to ensure it appears above previous email threads.
- Under “Signature defaults”, choose:
- Insert HTML signature:
- Copy the VCS email signature using the red button at the top of this page.
- Paste the copied HTML signature directly into the text box in the Gmail signature editor.
- Customize the NAME, POSITION, and PHONE EXTENSION to suit you.
- Save your settings:
- Scroll down and click Save Changes at the bottom of the page.
- Compose a new email to verify the signature appears correctly.
Your Gmail signature is now installed.
Using Gmail on mobile
It’s best to install and always use the Gmail app for iOS or Android. Then, your desktop-configured signatures are applied automatically on any emails you send from mobile (UNLESS you configure a mobile-only signature in the Gmail app, which is not recommended), following the signature preferences set in Gmail settings on desktop.